
Input Processes
Answers in this category:
![]() How can I scale a picture on an Input screen?
How can I scale a picture on an Input screen?
![]() How to add a second image to a frame in an input process
How to add a second image to a frame in an input process
![]() Message “Scrolling Frame Must Precede All Interactive Frames”
Message “Scrolling Frame Must Precede All Interactive Frames”
![]() How to have a scrolling input process display in-progress messages?
How to have a scrolling input process display in-progress messages?
![]() Display spaces instead of MM/DD/CCYY on an input screen which is inquiry only
Display spaces instead of MM/DD/CCYY on an input screen which is inquiry only
![]() Can my scrolling input refresh itself when a record is added or deleted?
Can my scrolling input refresh itself when a record is added or deleted?
![]() Can I use different image sizes in my scrolling input?
Can I use different image sizes in my scrolling input?
![]() How do I create a dynamically sized scrolling input?
How do I create a dynamically sized scrolling input?
![]() When using the PICTURE command I get Load Error!
When using the PICTURE command I get Load Error!
![]() How to set button (widget) colors!
How to set button (widget) colors!
![]() How to print tech doc for GUI input processes?
How to print tech doc for GUI input processes?
![]() How to get information about why the --- SEND FILE TO CLIENT subroutine failed?
How to get information about why the --- SEND FILE TO CLIENT subroutine failed?
![]() How can I dynamically apply Special Characteristics (Underline, Bold, Inverse Video)
How can I dynamically apply Special Characteristics (Underline, Bold, Inverse Video)
![]() What’s PreDisplay/Verify for?
What’s PreDisplay/Verify for?
![]() How to display the HELP text for the current Menu?
How to display the HELP text for the current Menu?
![]() How do you create dynamic screen titlebar text with ILF?
How do you create dynamic screen titlebar text with ILF?
![]() What are the rules for non-positive widget positions within an image?
What are the rules for non-positive widget positions within an image?
![]() How do I stop APPX from automatically displaying the next record during INQUIRY.
How do I stop APPX from automatically displaying the next record during INQUIRY.
![]() How can I make a constrained field editable?
How can I make a constrained field editable?
![]() Which fields in the --- WIDGET file correspond to the GUI attr. input fields?
Which fields in the --- WIDGET file correspond to the GUI attr. input fields?
![]() When I go into an Input screen with Optional Children exceeding option number 130 - options 1 through 30 are not there.
When I go into an Input screen with Optional Children exceeding option number 130 - options 1 through 30 are not there.
![]() Word wrapping on multi-line text fields.
Word wrapping on multi-line text fields.
![]() Is it possible to make the cursor on APPX thicker or more visible?
Is it possible to make the cursor on APPX thicker or more visible?
![]() How to blank out or make invisible a Field on an Image
How to blank out or make invisible a Field on an Image
![]() Optional frame may result in infinite loop
Optional frame may result in infinite loop
![]() How To Add a Picture to an input process
How To Add a Picture to an input process
How can I scale a picture on an Input screen?
How to add a second image to a frame in an input process
In order to add more than one input image to a frame, the check box under the column heading Mul Img (Multiple Images) on the Frames specification window must be set to "yes" (checked). The default value for this box is “no” (unchecked). If you are in change mode at the image level and want to add another image to this frame, pressing ADD will take you back to the Frames window. Check the Mul Img box and press Enter. You can now add additional images
A Warning message will be displayed at the Frames level when the Mul Img box is checked and Enter is pressed. This is to remind you to code the SET statement in Select Image. The designer must SET the --- ALTERNATE IMAGE NUMBER in the Select Image Event Point to control which image will be displayed for this frame at run time. Refer to the Images section in Chapter 3-1 of the Application Design Manual for a discussion of alternate images.
Message “Scrolling Frame Must Precede All Interactive Frames”
This message will appear when a scrolling input function is invoked that has multiple image specifications defined and the display only (Dspl Only?) checkbox is set to “no” on an image prior to the scrolling image. Within a Frame, all the images defined before a scrolling image must be display only.
Note; if a modifiable field is specified on an image that is defined as display only, APPX will automatically set the Dspl Only? flag to “no” when the image is saved. You can reset the flag to “yes” if your application requires a modifiable field on the image. Refer to Chapter 3-6 of the Application Design Manual for further information on the Dspl Only? specification.
How to have a scrolling input process display in-progress messages?
Display spaces instead of MM/DD/CCYY on an input screen which is inquiry only
Can my scrolling input refresh itself when a record is added or deleted?
Instead of executing the input directly, execute the job. Place a value in the CHILD ID field for the job step, such as RERN. In the Post Invocation event point add ILF code to test the value of a work variable to see if the input should re-execute or if the job should terminate. To re-execute the input set the value of --- NEXT CHILD ID to the value you entered on the job step (RERN). This will cause Appx to change its default behavior and go the job step with that child id and start processing from there.
In the parent input process, go to the Additional Attributes of the optional child and set the Parent Disposition to End Before. In places appropriate to your processing in the parent and/or the optional child (the full screen process) set the variable you are going to check in the Post Invocation of the job to a value to indicate if the parent input should be re-executed or not (this is the code mentioned above). Make sure the share class of the variable and the invocation type of the inputs are set so that the variable you use is visible to the Post Invocation event point of the job.
Here is an example from 1EX:


I added the following code to the ORDER2 Input Process, in 1EX, frame 200,
Option Intercept:

      SET      1EX  WORK LOG                  EQ     0

      *        Copy current line
      IF       --- OPTION                     EQ     USER 1

T     STORE    1EX ORDER2                     RECORD

T     BEG LOOP WI = 000 TO 001  STEP 000

T     COMPUTE  1EX ORDER2 SNO                 +      1

T     WRITE    1EX ORDER2                 FAIL 0


TT    SET      1EX WORK LOG                   EQ     1

TT    END PROC


Then in the parent process - INPUT ORDER1, i went to the  AA and gave it a

child ID of TSTT.

Then in the Post Invocation of the Child Rule i added:


    IF       1EX WORK LOG                   EQ     1

T   SET      --- NEXT CHILD ID              =      TSTT


It causes the child process to re-display silently and the newly added record

is displayed to a user.Can I use different image sizes in my scrolling input?
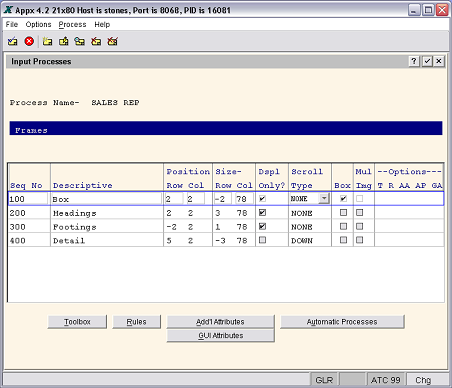
How do I create a dynamically sized scrolling input?
The first frame will have a starting position of row 1, column 1 (or whatever you want as your upper left corner anchor). The size will be set to -1 for the rows and however wide you would like for the data you need to display. The -1 tells Appx to end the frame one line up from the bottom of the display area. Set the box attribute to Y. Do no create an image for this frame (do not go to the image editor). This will be a display only frame.
The second frame will be the heading frame. The starting position will be the same as the first frame. The size will be the number of rows needed for the headings. This will be a display only frame.
The third frame is the footing frame. The starting position will be a negative number set to the number of rows needed for you footing information. This negative number tells Appx to start the frame that many rows from the bottom of the display area. This will be a display only frame.
The fourth frame will be the scrolling area. The starting row will be one more than the starting row of the heading frame plus the row size of the heading frame. The row size of this frame will be a negative number, one less than the starting row of the footing frame. That indicates to Appx to end the frame size that many lines up from the bottom of the display area.
See the image below for an example of the frame specifications listed above.
When using the PICTURE command I get Load Error!
You could get this message if your path to the image in misspelled or not accessible to the user running APPX.
Or, the picture field is not large enough to hold the complete path to the image.
How to set button (widget) colors!
When you create the button (or any other widget), assign a name on the
Button Properties screen.

In Pre-Display, based on the condition you wish to check:

     SET     --- WIDGET NAME =  <Name you gave the widget>
     READ    --- WIDGET HOLD 1 FT 0  BY WIDGET NAME
F    CANCEL      Widgit not found
     IF          <Condition you need to test on>
T    SET     --- WIDGET COLOR EN FG R  = <red value: 0-255>
T    SET     --- WIDGET COLOR EN FG B  = <blue value: 0-255>
T    SET     --- WIDGET COLOR EN FG G  = <green value 0-255>
T    SET     --- WIDGET COLOR EN BG R  = <red value: 0-255>
T    SET     --- WIDGET COLOR EN BG B  = <blue value: 0-255>
T    SET     --- WIDGET COLOR EN BG G  = <green value 0-255>
    *       Set the default color for button
F    SET     --- WIDGET COLOR EN FG R  = <red value: 0-255>
F    SET     --- WIDGET COLOR EN FG B  = <blue value: 0-255>
F    SET     --- WIDGET COLOR EN FG G  = <green value 0-255>
F    SET     --- WIDGET COLOR EN BG R  = <red value: 0-255>
F    SET     --- WIDGET COLOR EN BG B  = <blue value: 0-255>
F    SET     --- WIDGET COLOR EN BG G  = <green value 0-255>
   *
     SET     --- WIDGET COLOR EN FG NL = 1   <so color is not ignored>
     SET     --- WIDGET COLOR EN BG NL = 1   <so color is not ignored>
     REWRITE --- WIDGET FAIL 0

The color values are the decimal values for the colors.  For example; hex
color value #FFFFFF (white) is decimal value 255 for red, green, and blue.

The FG fields set the text color (foreground) on the button.  The BG fields
set the background color.  When you save the ILF READ and WRITE statements,
if it says the widget file could not be found, use Opt 88 to save the code.How to print tech doc for GUI input processes?
GUI Tech Doc now requires a minimum form width of 96 printable characters instead of the 80 character width that was previously used. However, if you define a form with a wider width (such as 120) then you will find that the screen image will be printed without splitting it into two parts. This will be especially useful for those of you who are designing input screens with a size of 28x110. The screen image will also be more accurately depicted if it does not need to be split into two parts to be printed.
Input process tech doc also includes complete documentation for all widgets that are defined in the input process and a rendition of the screen that closely resembles what you see at design time.
How to get information about why the --- SEND FILE TO CLIENT subroutine failed?
How can I dynamically apply Special Characteristics (Underline, Bold, Inverse Video)
What’s PreDisplay/Verify for?
     PRE-DISPLAY
     PRE-DISPLAY/VERIFY
     VERIFY
VERIFY is executed after the operator keys data and presses ENTER. It is not executed prior to displaying the screen. It is only executed after data entry. The this event point's purpose to validate data entered and to allow for displaying of ERROR and WARNING messages..
PRE-DISPLAY is executed only once when a record is initially retrieved in Change mode or Inquire mode, just before the screen is displayed. In Add mode it is executed once for each ENTRY LEVEL which occurs, just before the screen is displayed.
Pre-Display's primary purpose is to allow default values to be set, and screen attributes such as NO INPUT, etc.
The PRE-DISPLAY/VERIFY event point is the most difficult to understand because it is more or less a combination of the other two event points although there are some differences. It is executed before the screen is displayed after retrieving a record (much like PRE-DISPLAY).
However, it is also executed after data entry - after the VERIFY event point - just before the screen is redisplayed. It can be executed multiple times for a record being processed, not just once like PRE-DISPLAY. This is intended to facilitate displaying of related information such as data lookups, results of calculations, etc.
This event point should not be used to validate data unless the ERROR and WARNING messages are intended to be displayed when the screen is initially displayed since they will be executed at that point as well. This behavior is the source of the current discussion regarding error messages which display in inquire mode as well as other modes.
It is my contention that the prior behavior (before 3.3) of APPX was the correct one and there is a good chance that the next release (3.4) will revert back to that behavior.
How to display the HELP text for the current Menu?
Create a detached Optional Child:
--- SUBROUTINE HELP (PROCESS)
Give it a Pre-Invocation ILF command:
GOSUB --- HELP (GRAB CURRENT PROCESS)
How do you create dynamic screen titlebar text with ILF?
1) If no Window Label is defined in the widget, the label value comes from the first row of the screen. That will include the display values of any fields that are on line 1.
2) If there is a Window Label defined in the Window widget, that is used instead of the line1 text. You can name the widget and use ILF in Pre-Display of the image that contains the Window Widget definition. Read the widget by name, change the label, and rewrite it.
If you have an INPUT process with a Window widget Label and call another INPUT process that is the same or smaller size but has no Window widget and has Box? = No, the screen contents will be layered into the prior window and the prior windows widget will still be enforced. You can break this reuse by setting Box? = "?" on the child process frame, and/or add a Window widget to the child image.
What are the rules for non-positive widget positions within an image?
If widget row < 0 the widget will appear abs(row) rows above the bottom of the image
If widget column = 0, the widget will be centered (horizontally) within the image
If widget column < 0, the widget will appear abs(column) columns to the left of the right edge of the image
How do I stop APPX from automatically displaying the next record during INQUIRY.
SET --- EXACT KEY REQUIRED = Y
When the INQUIRY is in Key Entry, if a non-existing key value is entered, it will then not advance to the next record. Also, by setting:
SET --- AUTO READNEXT = N
... after a valid key has been entered and the INQUIRY has been run, when END is pressed, it will then not auto advance to the next key value. (Setting READ NEXT to NO in the INQUIRY's Additional Attributes does not accomplish this.)
How can I make a constrained field editable?
Setting the field to OK INPUT (or maybe Entry Level=0) will make the
field editable. But, then you will need the following trick to actually
get the changed value to save because APPX always restores the constraint
field values just before rewriting the PCF record.


In Pre-Update
STORE   XXX HOLD    RECORD


In Post-Update
READ    XXX HOLD (with hold)
RESTORE XXX HOLD    RECORD
REWRITE XXX HOLD
Which fields in the --- WIDGET file correspond to the GUI attr. input fields?
Text Position    WIDGET ALIGN HORIZ       WIDGET ALIGN VERT
---------------- ------------------------ --------------------
{null}           {null}                   {null}
CENTER           CENTER                   CENTER
TOP              CENTER                   TOP
RIGHT            RIGHT                    CENTER
BOTTOM           CENTER                   BOTTOM
LEFT             LEFT                     CENTER
UPPER LEFT       LEFT                     TOP
UPPER RIGHT      RIGHT                    TOP
LOWER RIGHT      RIGHT                    BOTTOM
LOWER LEFT       LEFT                     BOTTOM

Icon Position    WIDGET TEXT POS HORIZ    WIDGET TEXT POS VERT    WIDGET TILING MODE
---------------- ------------------------ ----------------------- -------------
{null}           {null}                   {null}                  {null}
BEHIND TEXT      CENTER                   CENTER                  {null}
ABOVE TEXT       CENTER                   BOTTOM                  {null}
TRAILING TEXT    LEFT                     CENTER                  {null}
BELOW TEXT       CENTER                   TOP                     {null}
LEADING TEXT     RIGHT                    CENTER                  {null}
ABOVE & LEADING  RIGHT                    BOTTOM                  {null}
ABOVE & TRAILING LEFT                     BOTTOM                  {null}
BELOW & TRAILING LEFT                     TOP                     {null}
BELOW & LEADING  RIGHT                    TOP                     {null}
EXPAND TO FILL   {null}                   {null}                  EXPAND
EXPAND PROP'L {null} {null} TILEWhen I go into an Input screen with Optional Children exceeding option number 130 - options 1 through 30 are not there.
Word wrapping on multi-line text fields.
Is it possible to make the cursor on APPX thicker or more visible?
How to blank out or make invisible a Field on an Image
Using ILF control, to temporarily remove a Widget (field) from an Image, perform:
SET --- WIDGET INVIS = YSee also the ILF verb 'BLANK', in the Application Design Reference Manual:
www.appx.com > Support > Online Manuals > Application Design Manual`
Optional frame may result in infinite loop
You can check for duplicate keys, primary and unique alternates, within a displayed frame and send a message to the status line informing the user of the condition. You could also set a flag in pre-pcf update and check this flag in select image and set the alternate image number to non-zero so the frame will be displayed.
How To Add a Picture to an input process
With buttons, labels, and picture widgets we used icons and images that are constant. The same image appears on the screen every time it is displayed. With the product input we will want to have a different picture displayed for each product.
This is accomplished by adding a field to the PRODUCT file to store the name of the image and using GUI attributes to tell APPX where the picture is located. You can add the alpha field to the screen and define it as a picture type (in Object Properties).
Add an alpha field to the PRODUCT file. It should be large enough to contain the name, or path and name, for the image. In this case we will not need a large field since the names we will be using are short. Don’t forget to restructure the PRODUCT file.
Add the new field to the PRODUCT input in two places. One entry will be the text field so that the image name can be entered. The second will be the location you want the picture displayed. That field should be non-modifiable and should have the rows and columns set to cover an area large enough for the image. In this exercise make the field fit into the area to the right of the data by inserting the image and using the size handles to drag it out. You may need to adjust the size after running a test.
On the second field, pull up the GUI properties screen and select the picture control. Set the location to DESIGN FILE. We will use a couple of existing images. In real life you would probably have a central repository on the server and would point to SERVER FILE.
That is it. We should be able to run the PRODUCT input and select an item in change mode. Enter image name in the modifiable product picture location field. The image should display in the second field.
The images are loaded into cache in memory when first displayed in order to keep from downloading the image each time it is displayed. Sometimes the cache does not clear when an image is entered incorrectly the first time. You may need to exit APPX and get back in if the name was entered incorrectly the first time.